Welcome to Moda Fabrics!
Little Ruby Joy Quilt
Little Ruby Joy Quilt
Summer time in the fabric world means...seasonal sewing! All of our Christmas lines will pop up at your favorite shops over the next few months. This month we are sharing a sweet little quilt made with sweet small-scale prints from Bonnie and Camille's upcoming Little Ruby line.
This quilt finishes at 72" x 80".
16 assorted Fat Quarters {Little Ruby by Bonnie and Camille}
3½ yards background and inner border fabric
1⅛ yard outer border border fabric
¾ yards binding fabric
5½ yards backing fabric
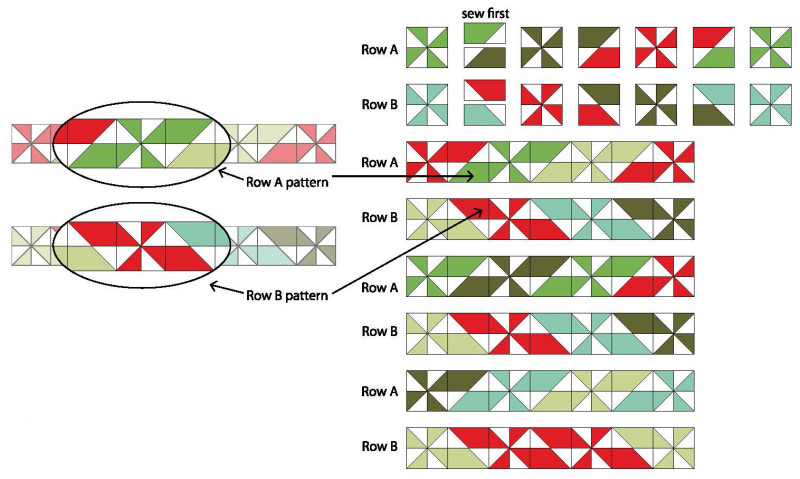
There are two different rows in this quilt. The pinwheels in Row A rotate in one direction and the pinwheels in Row B spin in the opposite direction. Note: You will be using each of the 16 prints twice.
Cutting
From each of 16 fat quarters, cut:
- 4 - 4⅞" squares
- 4 - 4½" x 8½" rectangles
From background and inner border fabric, cut:
- 8 - 4⅞" x WOF strips; subcut into 64 - 4⅞" squares cut once on the diagonal
- 16 - 4½" x WOF strips. Cut 8 strips into 64 - 4½" squares. Sew 4 sets of 2 strips together end-to-end and cut into 2 - 4½" x 64½" strips and 2 - 4½" x 72½"
From outer border fabric, cut:
- 8 - 4½" x WOF strips; sewn end-to-end and cut into 2 - 4½" x 72½" and 2 - 4½" x 80½" strips
From binding fabric, cut:
- 8 - 2½" x WOF strips; sewn end-to-end on the diagonal
Row A Blocks
(A) Select from one print:
2 - 4⅞" squares
2 - 4½" x 8½" rectangles
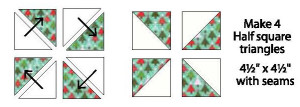
Carefully cut the 2 - 4⅞" squares on the diagonal as shown. Note the direction of the print.
(B) Combine the print triangles with a 4⅞" Background triangle to make 4 half square triangles.
(C) Sew the half square triangles together to make one Pinwheel block. Press the seams open.
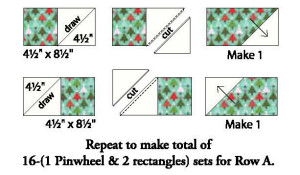
(D) Draw a diagonal line on the back of one 4½'' Background square. Layer the Background square and one 4½" x 8½' print right sides together as shown. Stitch on the diagonal line. Trim ¼" away from the stitching. Press to the corner to form a triangle. Repeat with the second print rectangle as shown.
Set aside the Pinwheel and 2 rectangles together.
Row B Blocks:
(A) Select from one print:
2 - 4⅞" squares
2 - 4½" x 8½" rectangles
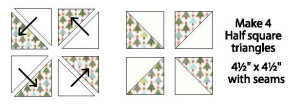
Carefully cut the 2 - 4⅞" squares on the diagonal as shown. Note the direction of the print.
(B) Combine the print triangles with a 4⅞" Background triangle to make 4 half square triangles.
(C) Sew the half square triangles together to make one Pinwheel block. Press the seams open.
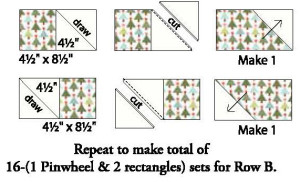
(D) Draw a diagonal line on the back of one 4½'' Background square. Layer the Background square and one 4½" x 8½' print right sides together as shown. Stitch on the diagonal line. Trim ¼" away from the stitching. Press to the corner to form a triangle. Repeat with the second print rectangle as shown.
Set aside the Pinwheel and 2 rectangles together.
Assemble the Quilt Top
Make sure you have the 1 Pinwheel & 2 rectangles sets in the correct row, either Row A or Row B. Layout the entire quilt top before you start sewing. A pattern is created by the placement of the blocks.
Sew the rectangles together first and then sew the row together. Keep checking to make sure you are making the patterns in each of the rows. Press away from the pinwheel blocks. You will have some leftover rectangles.
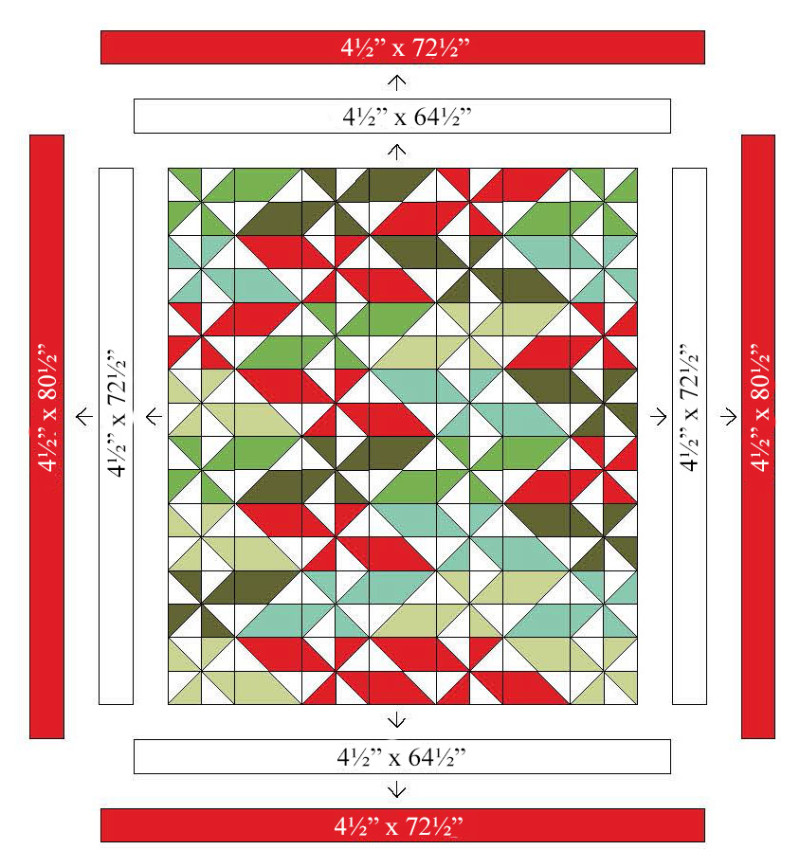
Add the Borders
Always press away from the center of the quilt top.
Add the 2 - 4½" x 64½" Background Borders to the sides.
Add the 2 - 4½"x 72½" Background Borders to the top and bottom.
Add the 2 - 4½" x 72½" Final Borders to the sides.
Add the 2 - 4½" x 80½" Final Borders to the top and bottom.
Sew the 8 - 2½" x WOF Binding strips together. Layer, quilt and bind. ENJOY!
This quilt finishes at 72" x 80".
Oda May
{modabakeshop.com}


